JSON to CURL Converter: Simplify API Debugging Logs
The Problem: Tedious API Request Retry from Logs
Sebagai developer, kita sering menghadapi situasi ini:
- Request Error di Production - API call gagal dan kita perlu retry
- Debugging dari Logs - Logs berisi JSON dengan URL, headers, body, dll
- Manual Copy-Paste - Harus copy-paste setiap field ke Postman atau tool sejenis
- Repetitive Task - Proses ini berulang setiap kali ada error
Bayangkan Anda punya log seperti ini:
{
  "url": "https://api.example.com/users",
  "method": "POST",
  "headers": {
    "Content-Type": "application/json",
    "Authorization": "Bearer eyJhbGciOiJIUzI1NiIsInR5cCI6IkpXVCJ9",
    "X-Request-ID": "abc-123-def"
  },
  "body": {
    "name": "John Doe",
    "age": 20,
    "age": 30,
    "role": "developer"
  }
}
Untuk retry request ini di Postman, Anda harus:
- Copy URL → paste ke Postman
- Set method ke POST
- Copy setiap header satu per satu
- Copy body → paste ke Postman
- Baru bisa klik Send
Terlalu banyak langkah manual! 😫
The Solution: JSON to CURL & Request Simulator
Tool ini dirancang untuk menyelesaikan masalah tersebut dengan auto-parsing dan instant retry.
🔗 Try it now: JSON to CURL Converter
Key Features
1. Zero-Config Auto Parsing
Paste JSON log Anda, dan tool akan otomatis mendeteksi:
- ✅ URL endpoint
- ✅ HTTP method (GET, POST, PUT, DELETE, dll)
- ✅ Headers (Authorization, Content-Type, custom headers)
- ✅ Request body
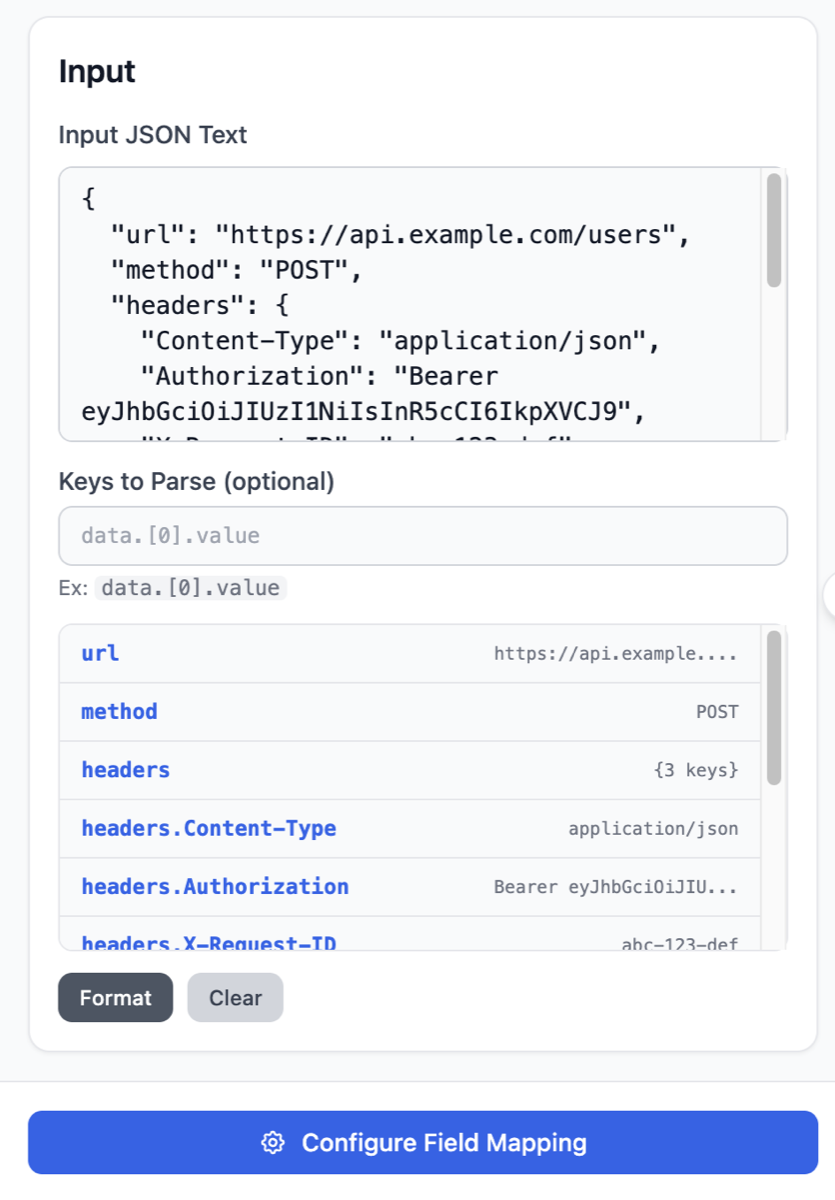
2. Visual Request Builder
Setelah parsing, semua field ditampilkan dalam interface yang mudah diedit:

Anda bisa:
- Edit URL atau headers jika perlu
- Tambah/hapus headers
- Modify request body
- Langsung lihat preview request
3. Instant CURL Generation
Generate CURL command yang siap digunakan di terminal:
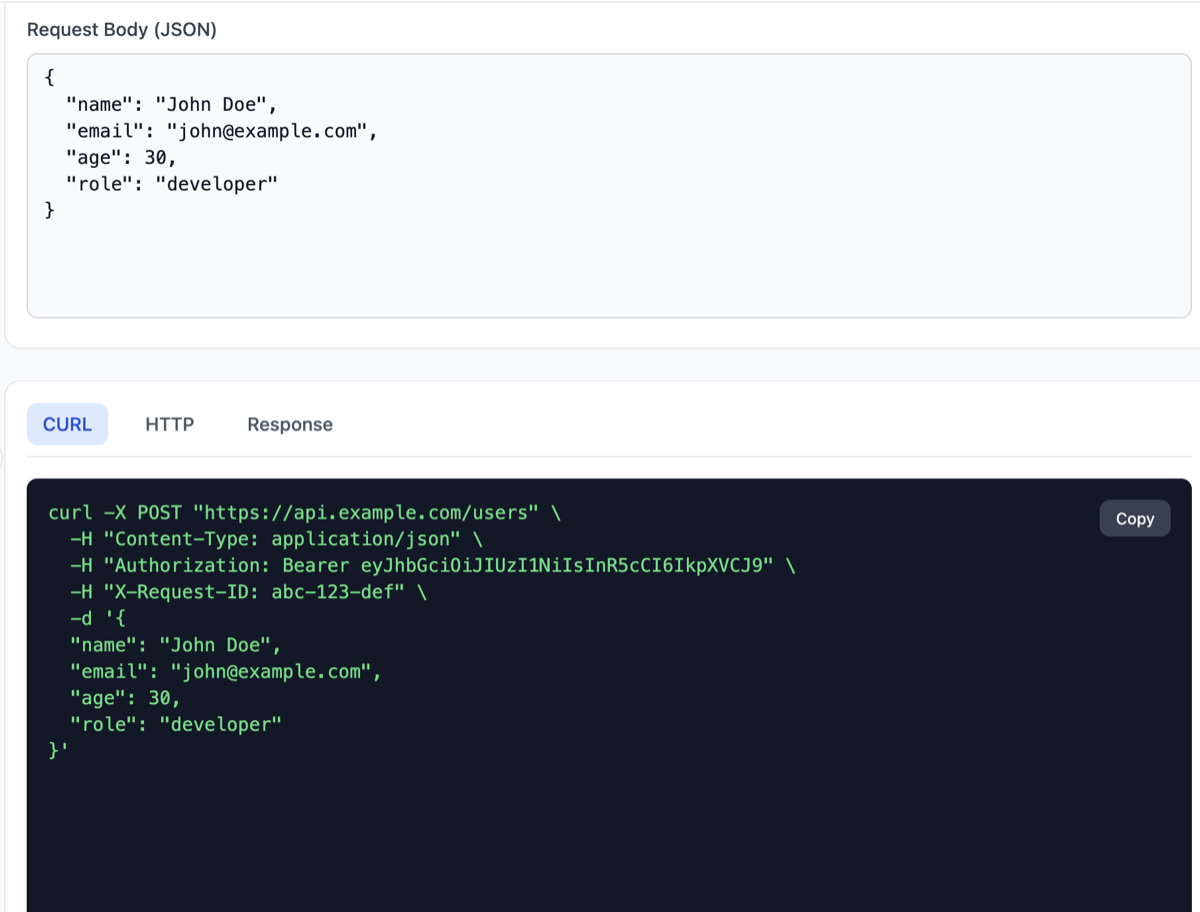
CURL command sudah include:
- All headers dengan format yang benar
- Request body (escaped dengan benar)
- Method flag (
-X POST,-X PUT, dll) - Ready to copy & paste ke terminal
4. Built-in Request Simulator
Tidak perlu pindah ke terminal atau Postman. Send request langsung dari browser:
- Klik tombol “Send”
- Lihat response real-time
- Debug langsung dari tool
Use Cases
1. Debugging Production Errors
# Log dari production
ERROR: API call failed
Request: {"url": "https://api.prod.com/orders", "method": "POST", ...}
Solution:
- Copy JSON log
- Paste ke tool
- Klik “Send” untuk retry
- Lihat response untuk debugging
2. Testing API Changes
Saat develop API baru, gunakan tool ini untuk:
- Quick testing tanpa setup Postman collection
- Share request dengan team (via CURL command)
- Validate headers & body format
3. Converting Between Formats
- JSON → CURL: Untuk automation scripts
- Logs → Reproducible Request: Untuk bug reports
- Quick API Exploration: Tanpa perlu setup tools
How It Works
Step 1: Initial Interface
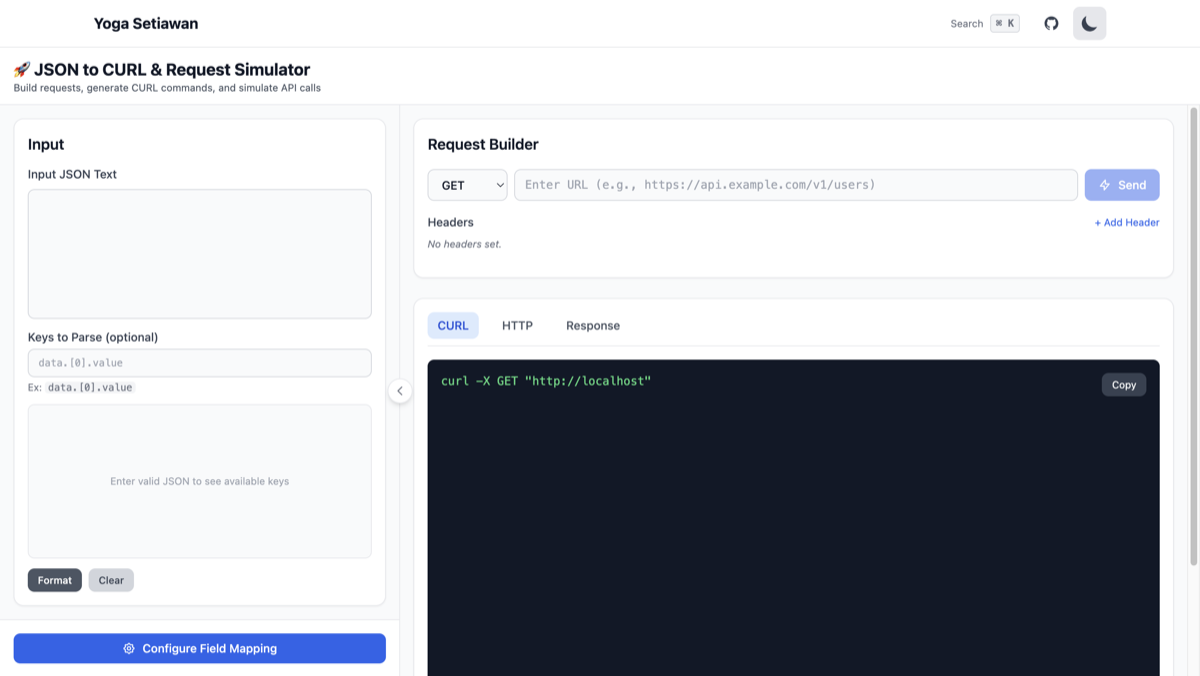
Tool menyediakan:
- Left Panel: JSON input area
- Right Panel: Request builder & output tabs
Step 2: Paste JSON Log
Paste JSON log yang berisi request information:
{
  "url": "https://api.example.com/users",
  "method": "POST",
  "headers": {
    "Content-Type": "application/json",
    "Authorization": "Bearer token123"
  },
  "body": {
    "name": "John Doe",
    "age": 20
  }
}
Step 3: Auto-Parsing Magic ✨
Tool otomatis:
- Deteksi URL dari field
url - Set method dari field
method - Extract semua headers
- Parse request body
Step 4: Review & Edit
Semua field sudah terisi otomatis. Anda bisa:
- Edit jika ada yang perlu diubah
- Tambah header baru
- Modify body
Step 5: Generate CURL atau Send Request
Option A: Generate CURL
curl -X POST 'https://api.example.com/users' \
  -H 'Content-Type: application/json' \
  -H 'Authorization: Bearer token123' \
  -d '{
    "name": "John Doe",
    "age": 20
  }'
Option B: Send Request
- Klik “Send” untuk execute request
- Lihat response langsung di browser
- No terminal needed!
Technical Features
Smart JSON Parsing
Tool ini support berbagai format JSON log:
// Format 1: Standard request object
{
  "url": "...",
  "method": "POST",
  "headers": {...},
  "body": {...}
}

// Format 2: Nested in log object
{
  "timestamp": "2024-12-23T06:30:00Z",
  "request": {
    "url": "...",
    "method": "POST"
  }
}

// Format 3: Axios-style config
{
  "url": "...",
  "method": "post",
  "data": {...},
  "headers": {...}
}
Header Management
- Auto-detect common headers (Authorization, Content-Type, dll)
- Add/Remove headers dengan UI yang simple
- Validation untuk header format
Body Handling
Support berbagai content types:
application/json- JSON objectsapplication/x-www-form-urlencoded- Form datatext/plain- Plain text
CURL Generation
Generated CURL command includes:
- Proper escaping untuk special characters
- Multi-line format untuk readability
- All necessary flags (
-X,-H,-d) - Compatible dengan bash, zsh, dan terminal lainnya
Why This Tool?
vs Postman
- ✅ Faster: No need to create collection/request
- ✅ Simpler: Paste JSON → Done
- ✅ Shareable: CURL command easy to share
- ❌ No advanced features (environments, tests, dll)
vs Manual CURL
- ✅ No Syntax Errors: Auto-generated, always valid
- ✅ Visual: See all fields clearly
- ✅ Editable: Easy to modify before sending
- ❌ Need browser access
vs Other Converters
- ✅ Auto-Parsing: Detect fields automatically
- ✅ Request Simulator: Send request directly
- ✅ Free & No Signup: Use immediately
- ✅ Privacy: All processing in browser
Privacy & Security
🔒 Your data never leaves your browser
- All parsing happens client-side (JavaScript)
- No server upload untuk JSON logs
- Request simulation uses your browser’s fetch API
- No logging, no tracking, no data collection
Exception: Saat Anda klik “Send Request”, request akan dikirim ke target API (bukan ke server kami).
Tips & Tricks
1. Quick Copy from Browser DevTools
// Di Chrome DevTools Console
copy(JSON.stringify({
  url: 'https://api.example.com/users',
  method: 'POST',
  headers: {...},
  body: {...}
}))
Paste langsung ke tool!
2. Save CURL for Automation
Generated CURL bisa disimpan untuk:
- CI/CD scripts
- Monitoring scripts
- Documentation
3. Test Different Environments
Edit URL untuk test di different environments:
https://api.dev.example.com/users     → Development
https://api.staging.example.com/users → Staging
https://api.example.com/users         → Production
4. Debug Authentication Issues
Paste failed request log, lalu:
- Check Authorization header
- Verify token format
- Test dengan token baru
- Compare dengan working request
Common Use Cases
Scenario 1: Failed Payment Request
{
  "url": "https://api.payment.com/charge",
  "method": "POST",
  "headers": {
    "Authorization": "Bearer sk_test_123",
    "Idempotency-Key": "unique-key-123"
  },
  "body": {
    "amount": 10000,
    "currency": "USD",
    "customer": "cus_123"
  }
}Action: Paste → Verify fields → Retry request
Scenario 2: Webhook Replay
{
  "url": "https://myapp.com/webhooks/stripe",
  "method": "POST",
  "headers": {
    "Stripe-Signature": "t=123,v1=abc"
  },
  "body": {
    "type": "payment_intent.succeeded",
    "data": {...}
  }
}Action: Replay webhook untuk testing
Scenario 3: API Migration Testing
Old API:
{
  "url": "https://api.old.com/v1/users",
  "method": "POST",
  "body": {"name": "John"}
}
New API:
{
  "url": "https://api.new.com/v2/users",
  "method": "POST",
  "body": {"fullName": "John"}
}Action: Compare responses dari both APIs
Configure Field Mapping
Kadang auto-parsing tidak sempurna, terutama jika format log Anda berbeda dari standar. Jangan khawatir! Tool ini punya fitur Configure Field Mapping untuk memperbaiki parsing.
Kapan Menggunakan Field Mapping?
Gunakan fitur ini ketika:
- ✅ URL tidak terdeteksi dengan benar
- ✅ Method salah atau tidak terdeteksi
- ✅ Headers tidak ter-extract
- ✅ Body ada di field dengan nama berbeda
Contoh Kasus: Custom Log Format
Misalnya log Anda seperti ini:
{
  "endpoint": "https://api.example.com/users",
  "httpMethod": "POST",
  "requestHeaders": {
    "Authorization": "Bearer token123"
  },
  "payload": {
    "name": "John Doe"
  }
}
Auto-parsing akan gagal karena:
- Field URL bernama
endpoint(bukanurl) - Method di field
httpMethod(bukanmethod) - Headers di
requestHeaders(bukanheaders) - Body di
payload(bukanbody)
Cara Menggunakan Field Mapping
Step 1: Klik “Configure Field Mapping”
Di sidebar kiri, ada tombol “Configure Field Mapping”. Klik untuk membuka dialog konfigurasi.
Step 2: Mapping Field yang Benar
Atur mapping sesuai dengan format log Anda:
URL Field Name:     endpoint
Method Field Name:  httpMethod
Headers Field Name: requestHeaders
Body Field Name:    payload
Step 3: Apply Mapping
Klik “Apply” dan tool akan re-parse JSON dengan mapping yang baru:
- ✅ URL:
https://api.example.com/users(dari fieldendpoint) - ✅ Method:
POST(dari fieldhttpMethod) - ✅ Headers: Authorization header ter-extract dengan benar
- ✅ Body: Payload ter-parse sebagai request body
Tips Field Mapping
1. Nested Fields
Jika field ada di dalam object nested, gunakan dot notation:
{
  "request": {
    "config": {
      "url": "https://api.example.com/users",
      "method": "POST"
    }
  }
}
Mapping:
URL Field Name:    request.config.url
Method Field Name: request.config.method
2. Array Index
Jika data ada di dalam array:
{
  "requests": [
    {
      "url": "https://api.example.com/users",
      "method": "POST"
    }
  ]
}
Mapping:
URL Field Name:    requests[0].url
Method Field Name: requests[0].method
3. Save Mapping untuk Reuse
Jika Anda sering bekerja dengan format log yang sama:
- Configure field mapping sekali
- Tool akan menyimpan mapping di localStorage
- Next time paste log dengan format yang sama, mapping otomatis digunakan
Common Log Formats
Berikut beberapa mapping untuk framework populer:
Axios Error Log:
URL Field Name:     config.url
Method Field Name:  config.method
Headers Field Name: config.headers
Body Field Name:    config.data
Fetch API Log:
URL Field Name:     url
Method Field Name:  options.method
Headers Field Name: options.headers
Body Field Name:    options.body
Custom Logger:
URL Field Name:     request.endpoint
Method Field Name:  request.verb
Headers Field Name: request.headers
Body Field Name:    request.data
Conclusion
JSON to CURL & Request Simulator adalah tool yang wajib di-bookmark untuk:
✅ Backend developers yang sering debug API
✅ DevOps engineers yang handle production issues
✅ QA engineers yang test API endpoints
✅ Anyone yang bosan copy-paste ke Postman
Stop wasting time dengan manual copy-paste. Start debugging smarter!
🔗 Try JSON to CURL Converter Now
Related Tools
Jika Anda suka tool ini, check out tools lainnya:
- JSON Parser - Parse & visualize JSON dengan syntax highlighting
- Base64 Encoder/Decoder - Encode/decode Base64 strings
Have feedback or feature requests? Feel free to reach out!